
A set of three physical interactions inspired by nature, built to help users relax and escape the stress of everyday life.
Oasis
Stress has always been a problem for people, but since the COVID-19 pandemic started, it seems to have gotten a lot worse. With all the restrictions due to COVID, people are working and taking classes mostly from home now, and that brings a lot of stress into their living space. The idea for this project was to find a way to help people relax and reduce stress levels when working or learning from home. I developed three physical interactions inspired by nature to help people find relaxation and connection to nature in order to relieve stress.


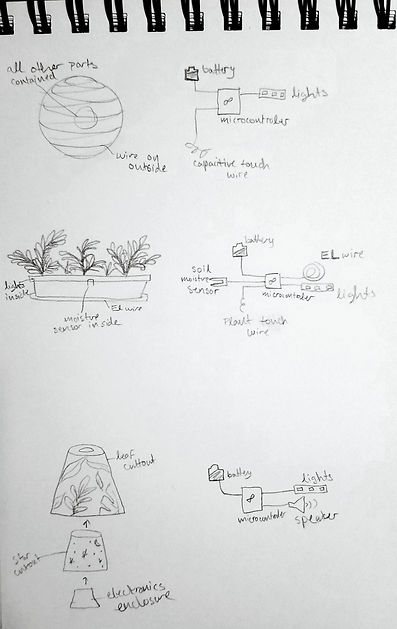
The breathing interaction was inspired by a water drop and the soothing repetitive nature of moving water. When the user touches the globe, a soft blue light will begin to glow and fade in time with a guided deep breathing exercise.
The plant interaction brings nature into your space. It is more than just a regular house plant though. Lights along the front edge of the pot fade from green to yellow to red to show the decrease in soil moisture and indicate when the plant needs to be watered. Also, when the user touches the center plant, lights on either side of it will glow in response to the touch. This can help the user to feel more connected to nature.
The light interaction tracks the time of day. With being inside so much due to COVID restrictions, it is easy to lose track of the time. This lamp glows green through the outer, leaf cut out shade during the day and blue through the inner star cut out shade at night. During sunrise and sunset, the lamp will gradually fade between the two colors for 20 minutes. This helps users connect to their natural circadian rhythm by signaling the rising and setting of the sun.
Image Gallery:


Below, you can see in-depth documentation of the work I did on this project for each week of the semester.
Capstone 2
This is the final class of my ATLAS Creative Technology and Design degree. I will be spending the entire semester building the project I proposed during Capstone 1.
Week 1 Reflection
In the first week of class, I had to come up with a new way to do my project. With the COVID-19 pandemic, an interactive and immersive installation space would be impossible to use and it is just not the time for this kind of project. In order to move forward I had to make some changes to my initial proposal. I have decided to take a more modular approach. Instead of creating an interactive installation space, I will create three or four separate interaction pieces that users can interact with in their own homes. Because I will not be building the project in a set space, the projection mapping piece will have to go. I still plan on using a lot of physical computing and artistic elements as well as some simple light projection. Though many aspects of the execution of the project will change, these pieces will still focus on relaxation and be based on nature.
This week I was able to come up with ideas for separate interaction pieces. I made simple sketches and planed the inputs and outputs I will need in simplified schematic drawings. The first few weeks of the semester will be dedicated to the electronics and physical computing elements of the project. For next week, I hope to get some feedback on my plans and begin to acquire the required electronics.
Breathing Interaction – crystal ball/water drop thing: capacitive touch and lights: when the user is holding the ball, lights will glow and darken in time with deep breathing pattern
Connect to nature interaction – Plants that respond to proximity/touch – lights or EL wire attached to plants will glow: soil moisture sensor – EL wire glows when plant needs to be watered
Enter a new space (sight, sound, smell) – light projects through leaves during the day and stars at night, ambient forest sounds play (change as day turns into night), essential oil thing for smells
Week 2 Reflection
This week I worked on building out the circuits I drew last week. I used three micro controllers, one for each interaction object. Two will have Adafruit Trinket controllers and one will have an Arduino Nano. I have never used any of these micro controllers before, so this week I had to do a lot of research on how they work and how to connect them. I tried to get all the sensors and lights together that I will need and connected those as well. The breathing interaction and the connect with nature interaction both are pretty well figured out. The new space interaction still needs some more decisions to be made before I can fully build out the circuit. In class this week I hope to connect with Arielle and get some help making sure all the circuits are built correctly and figuring out how to add batteries rather than wall power for at least one of them. This will help set me up to begin writing code over the next week or two. I am also hoping she can tell me a little bit more about what I might need for the new space interaction so I can more forward with it.

Breathing Interaction – I connected the Adafruit Trinket Micro controller to a capacitive touch wire and a strip of neopixel lights.
Connect to nature interaction – I connected the Adafruit Trinket to a soil moisture sensor and a capacitive touch wire. I also connected two strips of neopixel lights. I decided to replace the EL wire with more neopixel lights because they would better fit the aesthetic of the piece.
Enter a new space (sight, sound, smell) – For this interaction I just connected some lights to the Arduino Nano. I'm hoping to figure out what other pieces I am going to add to this one when I come to class this week.
Week 3 Reflection
This week I started writing code for the micro controllers I am using in each interaction. I got off to a little bit of a rough start because the micro controller did not want to connect to my computer. After trying several times to upload code to the micro controller, installing different libraries and drivers and a whole lot of internet research troubleshooting, I tried using a different micro controller of the same type and had better results. Once the micro controller and my computer were connecting, I started working on the plant interaction. I built a circuit that involved two strips of lights that can both be turned on and off with switches and wrote code to start testing it out. I will later replace the switches with a capacitive touch sensor and a soil moisture sensor to control the lights.
This week I also started doing some research on the real time clock chip that I will need for the light and sound interaction. It has a battery attached so that it will keep accurate time even when not connected to another power source. This is perfect for keeping track of the time for sunrise and sunset even when the lamp is not powered on. To write code for it, I will need to install the RTCLib library. It does look like it will take a lot more code and calculations to use this chip than I initially thought, so I will have to budget time for that.


For the breathing interaction I started experimenting with capacitive touch controlling a neopixel strip. I think in the final interaction I will probably use a large LED instead, because I do not like the way the neopixels transitions in discrete steps. I would prefer the fluid transition of the LED. I started using the ADCTouch library but quickly realized that it is not set up to run on the Adafruit Trinket M0 micro controller I am using. I transitioned to using the Adafruit FreeTouch library. After doing some research, I was able to write some code to turn neopixels on and off with capacitive touch.
At this point, I would say the project is about 30% done. I have most of the computing components and I have done a good amount of research and experimentation with writing code for them. I hope to finalize the computing components of at least one interaction by next week and be very close on the other two. Once the code is written and the computing elements are finalized on the breadboards, I can begin soldering elements together and building enclosures. I hope to be at a point where I can start work on enclosures within the the next two weeks.
Week 4 Reflection
This week I am trying to finalize the code and circuit set ups for my interactions. I think this will be the most complex part of the project, so it is important that I take time to do research, experiment and really find the best way to make my interactions work.
I started with the breathing interaction. Last week I got the basics of the interaction down with the neopixel lights turning on and off in response to capacitive touch. This week I was able to mostly finalize the interaction. I am using an LED rather than a strip of neopixels this time. I have written code to take the value fed in from the capacitive touch sensor and effect the LED. If the sensor is being touched, the LED will begin to fade brighter and then dimmer in time with deep breathing. As soon as the sensor is no longer being touched, the LED will turn off. The final part of this interaction will be attaching a battery for power. I do not have the parts to attach a battery yet, but I have done some research on how it will work so as soon as I get the parts I can add it in. The battery will allow the user to interact with the breathing interaction and not have to be connected to a wall outlet. I plan on using a rechargeable battery that the user will be able to charge when they are not using the interaction.
I also soldered pins onto another micro controller so I could work on more than one interaction at a time.

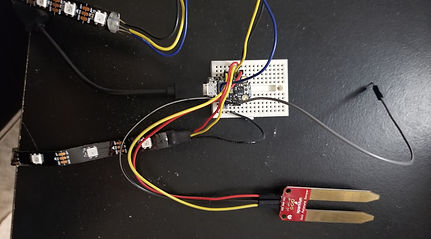
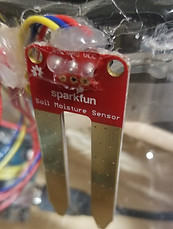
Next I started working on the circuit and coding for the plant interaction. I attached the soil moisture sensor and it was picking up readings, but the readings didn't make a lot of sense. I was getting high numbers (400-700) when the sensor was dry and low numbers (0-200) when the sensor was wet. I also got a lot of sporadic numbers in between with no obvious reason. From the research I have done, I should be getting 0 when the sensor was dry and up to about 500 when the sensor is wet. I tried to do some more research to if I could recalibrate somehow, but it didn't go very will. I think its a problem with the sensor itself, so I'll have to get a new one. I went ahead and attached the other components and started writing the code for this interaction even with the sensor giving weird values. When I get the new sensor I should be able to replace the bad one and have the code for the whole interaction working well.

In the picture above, you can see the plant interaction with the touch sensor at the top left, the moisture sensor at the top right, the lights that will be controlled by the moisture sensor at the bottom left and the lights that will be controlled by the touch sensor at the bottom right. I was able to get the lights working again, but the touch sensor was only returning a small range of values (span of 10-15). I think this might be a problem, so I need to do a little more research on how to fix that with either minor changes to the code I have, or redoing the code for that part with a different library. I am also thinking I will need a different sensor for each part of the plant. This means there will probably not be enough pins on the microcontroller to fit everything. I may have to put two microcontrollers in this project, one for the plant touch sensing and lights, and another for the soil moisture sensing and lights. I have faced a few setbacks this week, but I have adjusted my plan accordingly. Over the next week I will acquire all thee parts I need, and I will need to do a lot more research and testing with the electronics. Now that I have worked out the major issues, I should be able to move forward with finalizing the electronics of the interactions pretty quickly (end of next week hopefully) and start building enclosures soon after.
Week 5 Reflection
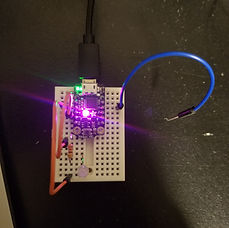
I did a lot of work on the coding of my interactions this week. The breathing interaction code was done as of last week, but this week I attached a battery to it so it could be used without being plugged in. In the picture you can see a piece in the middle of the wire that connects to the battery, this is a micro USB port that can be used to charge the battery.

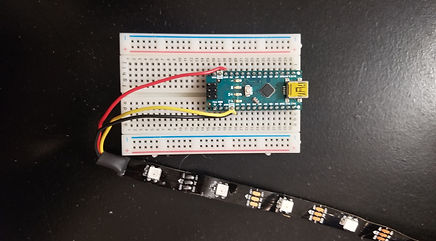
Next I spent a lot of time working on the plant interaction. Instead of using the Adafruit Trinket M0 as my microcontroller for this project, I decided to switch to the Arduino Nano. This new board has enough pins for both parts of the interaction. Since this board has ARV architecture rather than SAMD like the Trinket, I was able to use the ADCTouch library that I am more familiar with for capacitive touch. Using this library, I was able to get a much larger range of values for the capacitive touch part of it. With more pins available on this board, I was also able to attach three separate capacitive touch wires. I was also miraculously getting better values from the soil moisture sensor this time. I think it has a lot to do with using 5V power on this board as apposed to the 3V power I was getting from the Trinket. As you can see below, I rigged up a strip of Neopixels for the moisture sensor to control. I also have three LEDs as well as a string of Neopixels. I will use one of these two set ups for the capacitive touch to control. I wanted to experiment with both to see which would look better with the plant and be able to transition their brightness most accurately to the capacitive touch sensor values. I think I am leaning toward the string of Neopixels right now, but I want to do some more testing before I decide for sure. Now that I have all the elements attached and code for each input and output running, I can focus on fine tuning the code that allows them all to interact.

A: Three capacitive touch wires
B: Soil Moisture Sensor
C: Neopixel Strip
D: Three LEDs
E: String of Neopixels
I worked on the light interaction as well. I soldered pins onto my Adafruit Real Time Clock Chip. I then downloaded the RTClib library and began running some basic code to track the date and time. When I initially ran the code I got the correct date and time, but the values I got weren't changing as time moved forward so I will have to figure out why that is happening. I also found some resources on how to code sunrise and sunset times. It looks like I will need the latitude and longitude to tell the location of the interaction piece. I may have to find a way for the users to enter their location or make it only for use in specific areas (maybe grouped by state?). As I do some more research I should be able to determine the best way to account for location as it relates to sunrise and sunset times. Based on the usability testing I conducted a couple weeks ago, I found that most people preferred a soft transition from the day setting to the night setting and vice versa that is slow and gradual, potentially taking about 20 minutes. I will have to determine if LEDs or Neopixel strips will be better for this task. I have attached both options to my circuit so I can test both.

This week I was able to make significant progress on the circuitry of all three interactions. The basic functionality at this point is pretty much finished. Going forward, I will be fine tuning the code, building enclosures, and soldering the circuits together so they can be integrated into the enclosures to complete the interactions.
Week 6 Reflection
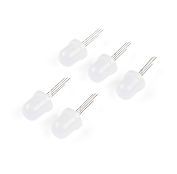
This week I am continuing to fine tune code and circuits, but I am also beginning the fabrication of the enclosures for the electronics and the main bodies of the interactions. After talking to an expert in materials for industrial design I have decided that the best enclosure for my breathing interaction will probably be some kind of pre fabricated plastic sphere. I found a six inch polycarbonate globe that is meant to be attached to a lamp post or ceiling light fixture that should work really well. I ordered that online along with five more LEDs to put inside the interaction to make sure the light fills the globe really nicely.


This sketch shows my plan for the fabrication of this interaction:
Next, I spent way too much time trying to figure out how to calculate the sunrise and sunset times without having to use a microcontroller that has connectivity capabilities. I did a lot of research, wrote a lot of code, did a lot of math, tried several different libraries, and finally cracked it! I ended up using an Arduino library called sunset along with the Arduino Time library. The sunset library is able to return sunrise and sunset times in minutes since midnight. I then wrote a function that converts that into the time in normal hours and minutes. Adjusting for daylight savings was my biggest issue because the dates that it starts and ends are not consistent every year (must be on Sundays). I manually made revisions for this in the code that will work through March 2026. I now have the interaction working so that one set of lights will turn on during the day and then they will switch to another set at night. Right now it s just a binary on and off transition, but my next step will be to implement a light fade for about 10 minutes. In the picture below you can see one LED and half of a neopixel strip lit up signaling daytime. At sunset, the other half of the neopixel strip and the other LED will light up.

For the light interaction, I also used Adobe illustrator to start making the designs for the laser cut shades that will cover the lights.


Week 7 Reflection
This week I started by focusing on the plant interaction because I did not get to much done with that one last week. I wrote code to make one set of lights change brightness based on the capacitive touch sensors and the other set of lights to change color based on the soil moisture values. The color of the lights would be red if the soil moisture was very low and then shift gradually between yellow and green, with pure green being fully saturated with water. I was not able to take a video of this because soon after I got it working, the Arduino Nano I was using just stopped working. It wouldn't connect to the computer or even turn on. I will have to ask for some help when I go to class this week, and I may have to get a new Arduino Nano for this interaction.
I also worked on the lamp shades for the light interaction. I used Adobe Illustrator to make a few possible options of the inner and outer shades. I will cut then in circles and rectangles in order to prototype a shallow cone and a taller truncated cone. I will laser cut these prototypes in class this week as well.


Week 8 Reflection
This week I am trying to make a lot more progress with the fabrication. I took my lamp shade design to the laser cutter so I can start testing lampshade shapes and seeing how the light looks through it. I did not notice until much too late that the laser had not cut all the way through my paper. I used a blade to cut out the piece as best as I could, but it turned out a little messy. I still have some good pieces to test lights with though. I also know that when I cut the real shades, I will need to make the design less fragile and set the laser cutter to a stronger power level. The pieces I am working with now do block the light pretty well, but they are so flimsy and are ripping pretty easily. That makes me think I will need to make a dome shape in a CAD program like Rhino and then unroll it and laser cut that shape to make the shape of the lampshade. I think that will be much more sturdy and look a lot better. It could also be helpful to attach the laser cut pieces to sheets of tracing paper and build the dome shape out of that. The tracing paper will give it structural support and diffuse the light really nicely.


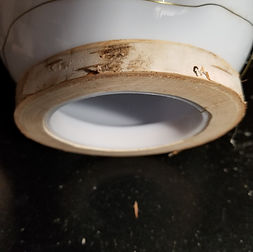
I also started soldering the breathing interaction this week. I decided to use a solderable breadboard and made it so that the microcontroller can plug in to it. I will also solder all the other components onto the solderable breadboard as well. I am having some issues getting the battery to work consistently for this interaction. I tested it with a couple other batteries and I am having the same results, so the problem may actually be with the battery charger. I might have to replace it. The next challenge will be finding a good material to make the base of this interaction out of. I'm thinking wood or acrylic so I will be able to laser cut holes for the switch and the charging port. I will also need to find a good way to attach wire to the outside of the globe. If I am able to get a strong enough capacitive touch reading, I may be able to let the adhesive cover the wire

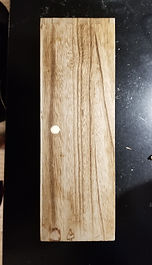
I ended up getting this wood slice to use as a base for the breathing interaction. I like it because it looks really natural and interesting, and because it is made of wood so I can laser cut into it. I should be able to cut a groove for the polycarbonate globe to fit right into.


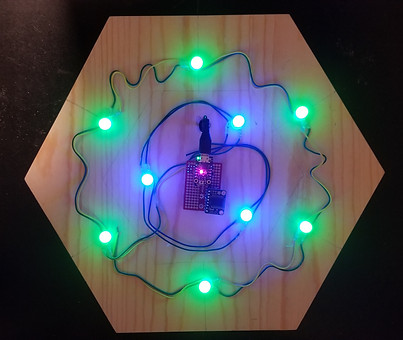
I got a couple of new microcontrollers this week as well. I soldered pins onto another Adafruit Trinket to replace the one that stopped working (above photo). I also got an Arduino Uno to replace the Arduino Nano of the plant interaction that died on me last week. I got it all connected and updated the code. In the video you can see three LEDs that change brightness based on capacitive touch sensors. You can also see a strip of neopixels that change color based on the values received from the soil moisture sensor (in the video I am just using my finger to simulate the moisture sensor values).
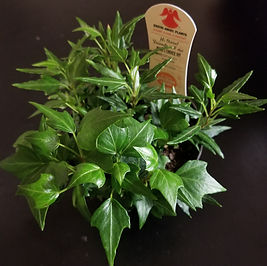
I also got a plant! I tested the entire interaction attached to the actual plan I am going to use and it worked pretty well. The soil moisture sensor caused the lights to change color as I moved it in and out of the wet soil. I may have to make some slight tweaks in calibration to get it to accurately reflect healthy water levels for the plant, but for the most part it is working really well. The capacitive touch sensors worked too. I just put the jumper wires of my prototype against the plant stems and it worked okay. I will have to plug in regular wire and wrap it around the plant stems to get better results, but the fact that it still worked with just the jumper wires gives me confidence. I may have to make some calibration adjustments for this portion as well, but so far it is looking pretty good.
Week 9 Reflection
This week I am continuing to work on the fabrication of my interactions. I started with the light interaction. I used Rhino, a 3D modelling program to test a few different shapes for the light shades. I ended up choosing a truncated hexagonal pyramid. I made a large one for the outer shade and a small one for the inner shade. I then unrolled the shapes so I can laser cut a flat template to build them out of.

Once I had my templates ready in Rhino, I transferred then to illustrator and started creating the images that would be cut out of the shade to create the light projections I am after.

The outer shade has a reflecting leaf pattern and the inner shaded shows stars in the night sky. Next I went to laser cut the piece. It took a long time to get the settings right. At first the paper wasn't being cut all the way through, and then the paper bas burning too much, but eventually I got it right. It then took even longer to actually complete the print.


Both shades turned out really well and I was able to fold and then glue them together. I was struggling to get the glue to stick so I reinforced it with masking tape to help it hold the correct shape while the glue dries.

Next I tested the shades with a light inside. I really like how the shades filter and project light. I may need to add a thin paper on the inside to help diffuse the light a little more, but I will do some more testing.


I also found a planter box with a plastic liner that I want to use for my plant interaction.

Week 10 Reflection
This week I really need to focus on putting all the pieces together and actually completing the interactions. I started with cutting and gluing the plastic liner of the plant pot so the plants can be suspended above the electronics. I also used a drill press to cut a hole for the power cord in the wood part of the plant pot.


I also did some more work on the breathing interaction. I cut the wood base I got to cover the neck of the polycarbonate globe. I used a drill press to saw an initial hole, and then I detached the blade of a fret saw and put it through the hole, reattached it and cut out the rest of the circle. I sanded the inside of the cut wood slice to make it fit onto the globe better.

Next I wrapped wire around the base of the globe and used small dots of hot glue to spiral the wire around the globe. I like the look of the kind of organic and uneven lines of the wire spiral. When I plugged it in to the microcontroller I realized that the wire wasn't returning very consistent capacitive touch values. I think since this wire has a colored coating on it, the capacitive touch readings I got from it were not strong enough. I also think the attachment method I used on the wire is not very secure and doesn't look very good. I will have to remove it, get new wire that is not coated and find a better way to attach the new wire to the globe.

I also started work on the base of the light interaction. I cut three one foot pieces of 1x6in wood that I will glue together to make a large, flat rectangle. I drew some lines on the wood so I will know where to cut it when I get into the wood shop. It will be a hexagon that extends about 1/2in past the edge of the large lampshade.

Back to the breathing interaction. I started soldering the connections for this piece. I had already attached header pins to the solderable breadboard so it was easy to attach the microcontroller. Next I attached the necessary wires to the solderable breadboard. I also connected wires to my on/off switch and to the LEDs. The only thing that was not soldered in was the capacitive touch wire because I havent decided what kind of wire I will use for it yet.


I turned it on to test my connections and they were all solid. I also attached the interaction to my computer to edit the code that controls the timing of the light glow. In the video below you can see how it is working at this point. The color of the light and how it looks in the globe shows up in a strange way on video. I think it looks a lot better in reality.
Week 11 Reflection
This week I started with fabricating a metal border for my plant interaction. It will cover the lights that are controlled by the soil moisture sensor and hide the edge of the plant pot where the plastic liner is attached. I went to the metal shop in the Art building and used sheet metal to make the border. You can see the tool I used to cut the metal and another tool to fold it. On the right you can see four edge pieces. Once I got home and tested the pieces on the box, I realized that the two short edge pieces need to be a little bit longer, because the front edge will have to stick out a little further past the edge of the planter box to make room for the soil moisture lights.


I used the soldering iron to start putting together the plant interaction. First I soldered the three LED lights that will be activated by the touch sensors. I covered the solder connections with a lot of hot glue to keep them safe from water. These lights will be in the planter box and may get a little bit wet, so I made sure to cover all the conductive areas in order to avoid a short. I did the same thing with the hot glue on the soil moisture sensor.

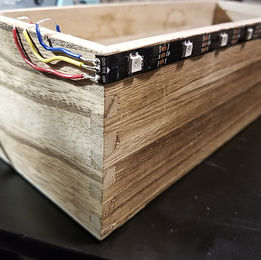
I also soldered a strip of neopixels and attached them to the outside of the planter box.They were then seccured with hot glue.

The connections for this interaction are complete. Next I will need to add in the plant, attach the touch sensors to the plant and do some tests to make sure the touch sensors are calibrated correctly. Once that is done I can seal the liner to the inside of the planter box and add the metal edges.

I worked on the breathing interaction this week as well. I found wire that is not coated and works a lot better as a capacitive touch sensor, so I soldered it onto the interaction.

I then painted the switch white to better match the rest of the piece. I also pained the power light on my microcontroller. Once it is placed in the globe, the purple color of the light effects the blue of the LEDs.


I arranged all the wires and other components so they would fit nicely inside the globe. I also filled the edge of the base with air dry clay to hide the electronics better.


I then removed the old wire and glue from the globe and attached the more conductive wire to it.

This is where I ran into some trouble. I thought is was pretty much finished, but for some reason, the touch sensor just would not work. I thought it had something to do with the soldering, so I took it all apart and soldered it all over again on a new board. This seemed to fix the problem, but I am still having trouble with the touch sensor. I seem to be getting different values when I use battery power and when I am using power from plugging the microcontroller into my computer. When it is plugged in to the computer I can monitor the values the sensor is returning and calibrate accordingly. When I am going off of batter power I seem to be getting different values, but I can't see what they are because the microcontroller is not connected to the computer where the values can be displayed. I think it will take a lot more messing with the code to fix this issue, but so far it isn't really working.
Another issue I am having is with the battery. Sometimes it just stops working. This is usually fixed by removing it and plugging a new one in, but once the enclosure is sealed, I won't be able to do that very easily. I think it might help to charge the batteries up all the way, but I will have to do a little more research and experimenting.
Yet another issue: I do not like the way the wire is glued onto the globe. I have spent a lot of time researching and experimenting and this is the best I could do for now. Maybe if there is extra time at the end I can try again, but this will have to do for now.

Last but not least for this week, I got in to the woodshop to work on the base of the light interaction. I used the table saw to cut off the extra edges. I also glued the three separate planks together and they will stay in the shop with clamps on for at least a day before I can go in and finish the piece.

Week 12 Reflection
I was able to resolve some of the problems with the breathing interaction from last week. I swapped out the Adafruit Trinket M0 microcontroller for an Arduino Nano. I changed the code and used the ADCTouch Library rather than the FreeTouch library for capasitive touch sensing.

Once all the connections were re-soldered to the new board and the code and calibration was adjusted, the interaction was working really well. The battery issue seems to be better too. The only slight issue I am still facing with this interaction is that the touch sense does not work if the battery charge is too low. I think this will be okay though, I will just have to advise users to keep the battery charged up.
I also worked on the wood base for the light interaction. I removed the clamps, used a band saw and a table saw to cut out the hexagon shape and then sanded off the extra wood glue and imperfections.

The plant interaction finally got a plant added to it! I planted the ivy plant in the plastic liner and attached the touch sensor wires to the leaves. I am a little disappointed because the touch sensors are not working as well as I had hoped and the lights shining on the plants do not look as good as I had hopped either. The soil moisture sensor and the lights associated with it are looking pretty good though.


Back to the light interaction. I did some math in order to code in a nicer fade between the day and night lights that calculates the brightness of each set of lights based on the time.

Next I soldered all the electronic components of the interaction onto a solderable breadboard.


And then I soldered the LEDs on.


I went to the wood shop and used the drill press to make a hole near the center of my hexagon shaped wood piece. I then used the table saw to cut a channel on the bottom of it. This will allow the power cord to be hidden on the bottom of the interaction.

Next I attached the board and all the lights to the wood piece. I also turmed on the piece to test the solder connections I made earlier.
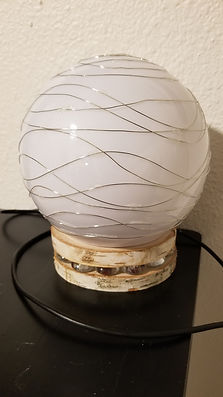
I then added tissue paper to help diffuse the lights.
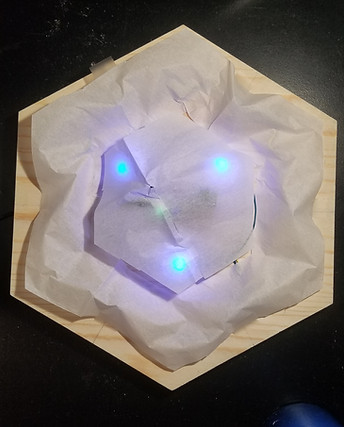
And finally I attached the laser cut shades to finish it off. I think this one is all done!

Here are some shots of the interaction with lights on:


I ran into some issues with the breathing interaction. It stopped working and I wasn't sure why until I took it all apart. It looks like the battery charger got too hot and burned right through.

I soldered on a new charger and a new switch, but I am still having issues with this interaction. I decided to remove the battery all together and just have a cord that the user will have to plug in when they want to use the interaction. I also filled the space between the wo wood layers of the base with glass pebbles instead of air dry clay. I like this solution better because the light shines through them really nicely. Now this interaction is finished as well.

All that is left is the plant interaction. The last few hours I spent working on this were chaos. The ivy plant I was using before did not have enough water content to be as conductive as I needed them to be. Also since all the ivy was connected, I could not separate out the three different lights and touch sensors. I solved this by going out and buying three new, separate plants with very high water contents.
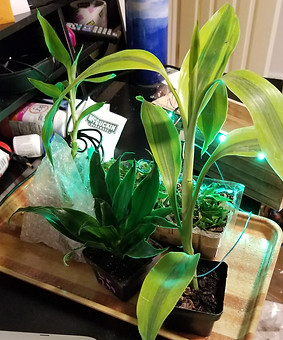
These plants worked great when I tested them with the touch sensors in their own pots! The problem was, they did not work when they were all in the plant interaction pot together. I think the water in the soil was conducive enough to make the touching of the plant irrelevant because my capacitive sensing was already maxed out from the connection that the soil made between the three plants. I tried a lot of different solutions involving different kinds of electrical insulation, different orientations of the plants and plant pots, and even eliminating some of the complexity. I finally landed on the orientation bellow. The lights and the soil moisture sensor are in the original plant pot along with the lights that will be activated by the touch sensor. I then have one of my high water content plants with a touch sensor on it in a small pot in the center of the larger pot. The thick plastic of the inner pot insulates the touch sensing plant enough for it to work.
